
Supposed that we have a small application which have dev, test and prod env. that should only be accessible for team members and we wanna have access from home or other locations, we’re setting up a simple OpenVPN server on a CentOS7 vm to communicate with local network.
We find a really nice article about setting up the vpn in 5 minutes here where you can find more details about
*it takes 2 🙂
Long storry short:
On vm:
wget https://raw.githubusercontent.com/Angristan/openvpn-install/master/openvpn-install.sh -O centos7-vpn.sh
chmod +x centos7-vpn.sh
./centos7-vpn.sh
On client:
scp root@vm.ip:~/client.ovpn .
yum install -y openvpn
openvpn client.ovpn
Now the connectivity needs to be active and we can ping the vpn serverping 10.8.0.1
All good, except that we can’t ping vm’s from the same network
The question is now “Routed” or “Bridged” configuration?
Next section is based on this great article which explain very good the essentials about TUN/TAP and Routed/Bridged so we are skipping theoretical info’s and taking only hands-on part
Routed way:
To set up a TUN setup with routing and masquerading for the VPN subnet, one approach could be something like this.
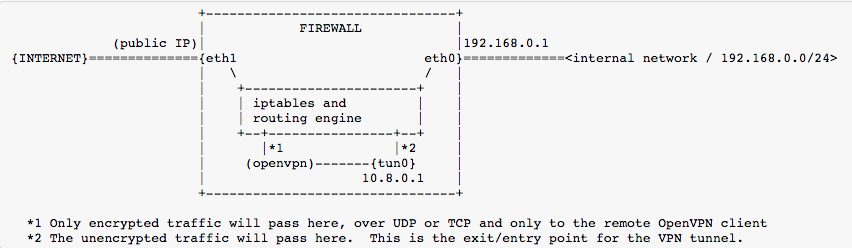
This example is based on a pretty standard network with a single Linux based firewall with two Ethernet card. We take the basic subnets 192.168.0-1.0/24 only for this tutorial. In a real scenario, if you connect to vpn from a home network/coffee shop which have the same subnet you will have a network conflict.
- First we need to be sure that IP forwarding is enabled
echo 'net.ipv4.ip_forward = 1' >> /etc/sysctl.conf - Add iptables rules
# Allow traffic initiated from VPN to access LAN
iptables -I FORWARD -i tun0 -o eth0 -s 10.8.0.0/24 -d 192.168.0.0/24 -m conntrack --ctstate NEW -j ACCEPT
# Allow traffic initiated from VPN to access "the world"
iptables -I FORWARD -i tun0 -o eth1 -s 10.8.0.0/24 -m conntrack --ctstate NEW -j ACCEPT
# opt. Allow traffic initiated from LAN to access "the world"
# iptables -I FORWARD -i eth0 -o eth1 -s 192.168.0.0/24 -m conntrack --ctstate NEW -j ACCEPT
# Allow established traffic to pass back and forth
iptables -I FORWARD -m conntrack --ctstate RELATED,ESTABLISHED -j ACCEPT
# Notice that -I is used, so when listing it (iptables -vxnL) it
# will be reversed.  This is intentional in this demonstration.
# Masquerade traffic from VPN to "the world" -- done in the nat table
iptables -t nat -I POSTROUTING -o eth1 -s 10.8.0.0/24 -j MASQUERADE
# opt. Masquerade traffic from LAN to "the world"
# iptables -t nat -I POSTROUTING -o eth1 -s 192.168.0.0/24 -j MASQUERADE- Modify the /etc/openvpn/server.conf file
push "route 192.168.0.0 255.255.255.0"#the needed route for all VPN clients to the internal LANpush "redirect-gateway def1"#VPN clients to send all the internet traffic via the VPN - Append a port forward rule to iptables to be able to reach your vm.ip:1194 from the public ip:
iptables -t nat -A PREROUTING -i -p udp --dport 1194 -j DNAT --to vm.ip:1194 - *If vm that holds openvpn-server is not the default gateway for your local vm’s network you need to set a routing rule to fw traffic through openvpn-server. What this means? It means that all your traffic need to end up in openvpn-server (for eg. , otherwise your network won’t know how to route back traffic initiated from openvpn clients.
Now, you can keep digging 5 minutes more to hardening your implementation.
That’s all 🙂
In the following section we have only a few notes about bridged way, so it’s not a final implementation.
Bridged way:
OpenVPN have a good documentation so here is explained the bridge configuration. If you’re not a network master maybe is better to opt for CentOS7 because the ‘bridge-utils’ package is
deprecated for CentOS8
For setting up OpenVPN in Proxmox LXC we find an interesting article here but, for a moment, we consider that is better to run the OpenVPN server into a vm.